Navigating SOI TATOR
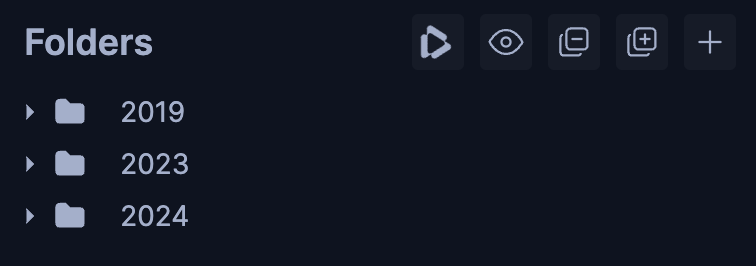
Navigating folders/folder names
The videos are organized in nested folders. You must click into the third layer of folders in order to see the actual video files within them.
Level 1: The folders are broken down by the year of the cruise. It is normal for this level of video to look “empty” when selected, as you need to select into the third level in order to see the videos.
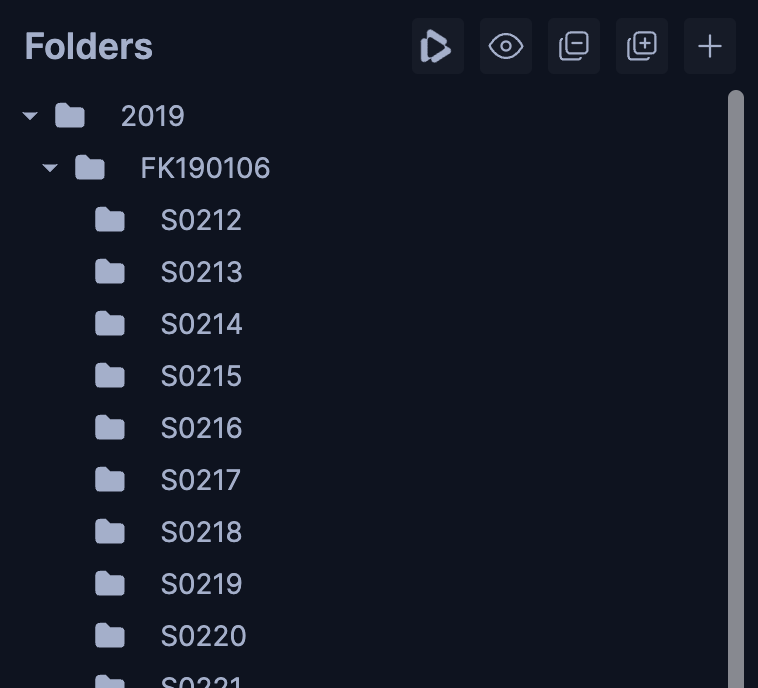
Level 2: Each year folder contains cruise folders. The cruise folder name represents the cruise ID. The folder prefix in 2019 “FK” corresponds with the “R/V Falkor” ship, while the folders in 2023 and 2024 videos have the prefix “FKt” for the new “R/V Falkor (too)” ship. The values following the ship identifier are the year, month and day of the beginning of the expedition as two digit year, two digit month and two digit day. It is normal for this level of video to look “empty” as you need to click into the third level in order to see the videos.

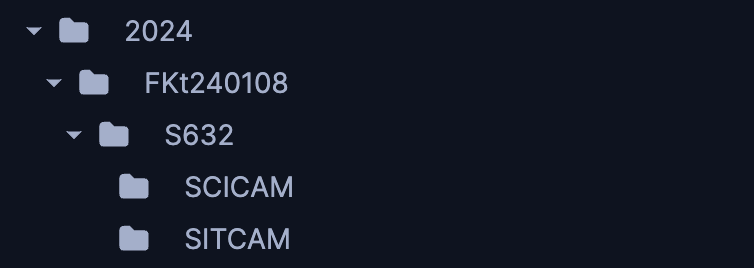
Level 3: Within each cruise folder are dive folders. Once you click into a dive folder, the videos will appear. The folder name represents the dive ID. For the 2023 and 2024 dives, the videos at this level will be a dual-view of the “SCICAM” (science camera) and “SITCAM” (situational camera). The SCICAM (science camera) is in 4K, and the SITCAM (situational camera) is HD.
Level 4 (for 2023 and 2024 year folders): For the 2023 and 2024 dives there is an additional fourth layer of folders that splits up the dives into the respective SCICAM and SITCAM. You have the option to work with one camera at a time or with both at the same time, depending on which level you select (3 or 4).
Creating a bounding box
One of the most common actions to perform is creating a bounding box. To create a bounding box, click the “box” icon in the left tool bar and drag the mouse on the video where you want to create the bounding box. Once drawing the box, you will be able to make a high-level categorization of the observation, input any relevant information, and click “Save”.
When making a high-level categorization, you are able to select between four initial options: Fish, Geology, Anthropogenic, and Invertebrates/Others. Once you have selected the top-level classification, each option will present a series of specific criteria that can be optionally entered. For Invertebrates/Others, we have added an additional classification field beyond Scientific Name called “Morphological”. This morphology field uses the SMarTaR-ID classification scheme to characterize localizations.
To view the bounding boxes, you can view and click into the observations in the Entities section on the right side of the screen. Click the “Go to Entity’s Frame” button to view the bounding box.
Additionally, you can create dot, line, and polygon objects by clicking the icons on the left tool bar. These observations can also be found in the “Entitites” section.
You can find additional information on how to annotate on Tator’s user guide.
Creating clips
An instructional video can be found in the left tool bar by selecting the clipping icon in the left toolbar: 
- Begin by right clicking on the video seek bar at the starting point of the clip.
- Repeat at the ending point of the clip to create two segment markers.
- Right click on the yellow bar that appears in the selected time region, and click “Generate clip”.
- Select which feed you prefer (SCICAM/SITCAM) and wait for your clip to be generated. This step may take a while, but you can view progress based on the video preview.
Editing existing annotations
If you have an existing annotation that you would like to make updates/changes to, you can edit an annotation by selecting the entity category, the annotation, and clicking “more”. Any changes that you make to fields in for this annotation will save automatically.
Using the annotation browser
The navigation browser contains three main modals:

The first modal consists of the file name.
- 2023-12-13 represents the date in YYYY-MM-DD
- T16:15:57+00 represents the time and time zone the recording begins
- .multi represents the dual-view camera
Navigating sensor data
The third modal contains sensor data from underwater scientific instruments attached to SuBastian. As you progress through the video, the sensor data will update to match where you are in the video.
The data includes: Timestamp, Temperature (˚C), Pressure (dbar), Salinity (ppt), Depth from sbe49 (m), Depth from uvsvx (m), Sound Velocity (m/s), Heading True (deg), Altitude (m), Position, O2 Concentration, and O2 Saturation.

Beyond the data fields with sensor data values, you can view the data across the length of the entire video using the observation tracks. By clicking the graph-like button beneath the video (shown below), a series of tracks will appear containing a frame-by-frame graphical visualization of the data. These can be very helpful to get a brief, big picture view of the sensor activity across a video.
R/V Falkor (too) is the cruise ship, and SuBastian is the actual ROV (remote operated vehicle) that performs the dives. Details on the specs of SuBastian and its sensor equipment can be found at SuBastian System Overview.